Monday, February 16, 2015

Penny Patch: A Finish!

I did it. I free motion quilted a whole quilt. A pretty big quilt at that. And . . .  IT'S AWESOME!

I don't really know what else to say about it. I am over the moon proud of myself on this one. Plus, I said most of it here.


I will make one confession though. When I very first sat down and was quilting my first row, I was having a heck of a time. I couldn't figure out what I was doing wrong. I knew it would take a bit to get back in the groove I was in when I finished my drawstring bag, but this felt like more than that. Not sure exactly what finally made it click, but I realized that I hadn't lowered the feed dogs. DOH! Me, myself and I had a pretty good laugh about that, and now you can too.


It has taken me a lot longer to share than finish than I intended but alas, the short and often rainy days here in the Pacific Northwest make is difficult to get good, well any, outdoor photos. Thanks to our current lovely false spring, I was able to get to my mom's house and take some pictures! We were still a limited on what we could do with the very damp ground and lack of greenery, but still, pictures to share!

I love how the back came out. There wasn't enough of the purple print to do the whole thing so I supplemented with some giant squares of coordinating fabrics.

I almost didn't manage to leave my mom's house with this with the quilt, she has been trying to claim it for her own each and every time she sees it, despite the fact that I made her a quilt all her own, in fabrics she picked out! More on that later!


Wednesday, December 17, 2014

Testing, Testing

Practice makes perfect right? Well, I figured at least it couldn't hurt. Before launching into the challenge of FMQ my Penny Patch quilt, I decided to do a little test project.

I was browsing around on Pinterest and came across this little cutie: http://www.pinterest.com/pin/238831586462998727/

I decided this was exactly the project I needed to tackle to practice my FMQ. Bigger than a coaster, but not to the level of making another quilt.

It always amazes me how much patchwork "shrinks" as you sew it!


I will admit that I did not buy this pattern. I know right. I feel guilty about it, but that is one of those things about quilting. You get good at looking at a pattern and being able to see what it took to put it together. Especially if it is something classic like squares or half square triangles. Also, there are a lot of free tutorials out there on quilted drawstring bags. . . so, yeah. How do you decide if you should purchase a pattern or not? I would love to hear others thoughts on this one.

Here are the tools I used to come up with my "pattern."

  • Looked at the finished dimensions listed on the pattern. I decided that seemed like a good size and figured up how many finished 1.5" squares I would need to get close. It was important to me to do the quilting on the EXACT same scale that I would be doing for the Penny Patch quilt. So, even if I had purchased the pattern, I likely would have needed to adjust it anyway, but I rationalize.
  • Used a free tutorial from Pink Penguin on how to create the casing on the top. I ended up needing to make the strip bigger to accommodate my larger cording, but otherwise was able to follow the directions in their entirety.
  • Went to my go-to bag book: The Bag Making Bible for the instructions on installing the flush zipper. I have used these instructions quite a few times but never seem to be able to remember all the steps without looking them up.
  • Followed the directions that came with my grommets.
  • Looked at a similar drawstring bag I have in the house to figure out the amount of cording I needed. In the end, it as mostly a guess so I hedged my bets and over bought. Many thanks to the Husband who helped me figure out how I needed to insert the cording so the bag would actually cinch. I was nowhere on that one.

And TA DA! A cutie patootie little bag!


Now don't get me wrong, there are some downright ugly flowers on this bag. The FMQ definitely took practice and getting used to, but by end, I was pretty happy with how my little flowers were turning out.


I intended for this to double as a scrap busting project so I went to work digging through my enormous scrap bin. BUT I was so inspired by the color palette of three little scraps, that I ended up at Fabric Depot. I was able to use scraps for the lining of both the inside of the bag and the pocket, so it wasn't a complete scrap failure. I am glad that I went for it though. I absolutely love how it turned out! And to top it all off, it really was great practice before diving into my Penny Patch.


After careful consideration of the "ugly" flowers on the back of the bag, I decided this bag was just too cute to languish around my house so I have listed it for sale in my Etsy shop. Check it out!


Wednesday, December 3, 2014

Tackling the BEAST

The Biggest of them All


Remember this UFO?


A twin size quilt for Brother. I have been pretty intimidated by idea of quilting this at home. I toyed with the idea of renting time on a local long arm machine, but decided I am too cheap and too busy to make that work.

After a lot of the usual hymning and hawing, I decided to keep it simple just do straight line quilting.

I pin based half of the quilt and spray basted the other half. I figured that if the spray worked out well, after I quilted that half, I could take the pins and out and spray the other half. That way at least half of the beast would be fully secured at any given time.

I'm not going to lie, this is A LOT of quilt to wrangle. I moved my machine as far over and as far forward on the desk as I could to allow for maximum work space.

The first bit in the very middle was the hardest. After that, it got quite a bit easier and I hardly noticed the giantness of the quilt. I did a full 3.5 hours and finished half of the quilting!!!

The rest didn't go quite as quickly, but I was excited to get this done and managed to find time here and there to get it all finished up. All that is left now, binding the beast. I have the fabric and plan to machine stitch and finish with a zig zag as opposed to hand stitching. I know that this quilt will need to endure a lot of washing so I want it to be extra durable.


The quilty goodness.

Hopefully this will be a finish very soon, but there are a few other projects out there distracting me. . .

Thursday, October 16, 2014

Fireworks: A New Project

Challenges


At this point in my quilting career, I feel like I have kept my projects pretty safe and straightforward, playing more with color than shape. The first real tricky project that I tackled was my Hopscotch quilt and we all know, that even though I won the round with the quilt top, I still have yet to do battle with the quilting :)

One project that I knew would be challenging, but caught my eye nonetheless, was another pattern by Camille Roskelley, Fireworks.

The only change I planned to make to the pattern was to make it smaller. Oddly, I have this thing against square quilts. To me, blankets should not be square, they should be rectangles. So there. I planned to make only 12 blocks so the quilt would be three blocks wide and four blocks tall.


My fabric choice also came to me right away. I wanted to use Denyse Schmidt's Chicopee collection. I had a full set of fat quarters stashed away for just the right project!


A Family Affair


I had the pleasure of traveling to Upstate New York for work. That just happens to be where my extended family is from, so I snuck in a little visit. My aunt Anna is an accomplished quilter and I knew she was just the person to help me tackle this challenge, so I made sure to pack my fat quarters and pattern in my suitcase.

My cousin and I headed over to my aunt's place and enjoyed a lovely afternoon of chit chat and sewing. At the end I had a completed quilt square! Not bad! These are by far the best flying geese I have put together and almost all the points look great. Color me pleased.

DSC08739
My first fireworks block.

Languish


As I shared in my Penny Patch post, I am not really a fan of the whole cutting part of quilting. At my aunt's, to keep things simple, I had only cut out what I needed to make the above block. On top of not wanting to tackle the amount of cutting involved in making 11 more quilt blocks containing 73 pieces each, I was struggling with my design choice. What were the best fabrics to put together in each block? Should I only use one of the color ways in the collection, or both as I had planned? Was the grey background going to make the quilt look dull? So I pondered and mulled and occasionally pulled the the fabrics out to see if I could come up with something that would make me happy.

At long last I decided that I wanted to continue to tackle this challenge. I thought the best way to get my mojo going was to make some progress. What feels like progress? More blocks! Here is my second block.


DSC08737
My second block.

Buoyed on, I finalized my fabric combinations and got all the patterned pieces cut out.

Fireworks Pieces
The rest of the color and pattern combinations

Now all I need to do is cut out all the background fabric. Not a small task. I don't want to let this one languish too much longer, but I do have a few other things on top of my list to finish before I continue this challenge. At least now I am excited to see it come together!

Tuesday, September 23, 2014

Penny Patch: Work in Progress

Following Along

When I first saw Rachel's Penny Patch quilt and that she was offering a quilt along, I was very excited. I loved the original quilt (pictured below) and the coincidentally the colors she chose for the QAL were the same ones I had in mind when I thought of making my own :)


I quickly purchased fabric, of course, the easy and fun part! This time I was even a good girl and used several prints from my stash. Then like so many other things, it sat and waited for me to have time and the desire to tackle the cutting. I have come to realize that cutting is one of my least favorite parts of the process. I do my best to power through all the cutting in one fell swoop knowing that if I don't, it could be a long while before I am willing to do it again. 

Cutting


This meant that long after the QAL was over, I set out to cut out my fabric. This was MUCH trickier than I anticipated in terms of cutting the right number of fabrics in the right colors and right sizes. I kept my laptop handy and referred often to the instructions. The process was tedious and it took me an ENTIRE Saturday. I kid you not. I wanted so badly to start sewing things together, but it was just too darn late.

Penny Patches


Next it was time to sew together the penny patches. Since you actually sew strips and then cut them down, it meant that I had to put my penny patches together BEFORE I could lay the quilt out and see what I wanted to put together. Boo erns.

Another confession, I am very OCD about my quilt layouts. I put everything out on the dining room floor and crawl around on my hands and knees swapping little pieces here and there until everything is just so. I have tried being more loosey goosey about it, but it just makes me nuts and I end up ripping things out, and going through the tedious layout process anyway.

But in this case, there wasn't much of choice, I put together fabrics I liked and got sewing.  With that done, I could finally lay out the quilt. Yay!

Layout Attempt #1


Hmm. It looked like nothing but a hot mess to me. Does anyone else agree? The first time I laid everything out, I paid no attention to what direction the darker value fabrics were going on the larger four patch squares, only the penny patches. It just made everything "frustrating" looking. Despite the cohesive color scheme, nothing really looked like it belonged together and it felt like the quilt was fighting with itself.  Defeated, I put everything back in a giant pile and went and had a glass of wine.

Layout #2


To minimize the messiness of the ba-jillion pieces, I made the un-me like decision to sew the larger four patches together before laying the quilt out again. I was nervous, but feeling cautiously optimistic. This time when I laid the pieces out, I made sure that the darkest values were all going the same direction. I also did a better job of dispersing my low volume prints throughout the quilt. This was also partly due to my pre-sewn pieces.


I'm not sure if you can tell the difference between the two, but I sure could. I was much happier with this second layout.

And then . . .


I sewed it all up! Since I was very wary of pieces getting out of place in my carefully constructed layout, I sewed the rows together straight across instead of putting the little penny patch squares together before constructing the rows. It made the process a bit slower, but I was more comfortable with it.


I was so excited that I snapped a photo a few rows in!


Voila! My penny patch quilt top!

DSC08928

FMQ, eek!


Yep, that's right folks, my plan is to free motion quilt this one. It will be my first. I am buoyed by the fact that the pattern is very deliberate. I don't have to try and fill in space creatively and hope it all works out. Rachel put a great tutorial together on the dogwood quilting pattern, to compliment the original one from Elizabeth.

Wish me luck.


Sunday, September 21, 2014

Curio Hourglass Quilt: A Finish

The Beginning


I went out to Holly Hill Quilt Shoppe with mom for the first time quite a while ago and they had a collection from BasicGrey that I had not seen before, Curio. I loved the yellows in it and definitely wanted to add this collection to my stash.


There wasn't a lot left yardage wise, so I decided to pick up a layer cake. When I was browsing around on Pinterest, I cam across 
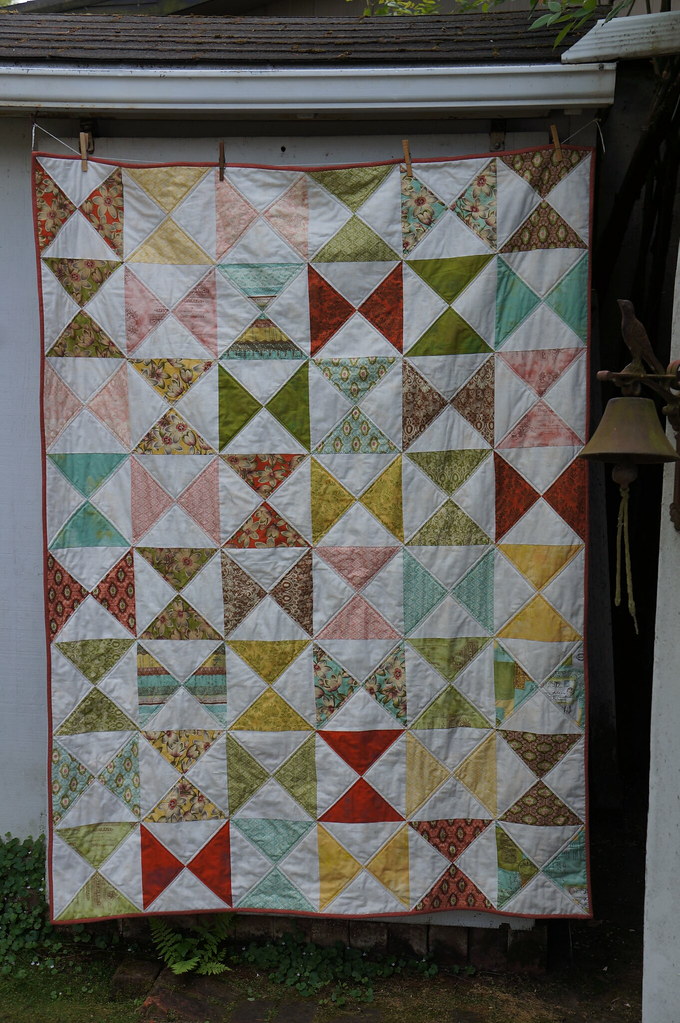
this quilt complete with video tutorial. Perfect! Over at Fabric Depot, I picked up some white from the Moda Grunge line for my neutral because I liked the way it complimented the collection.

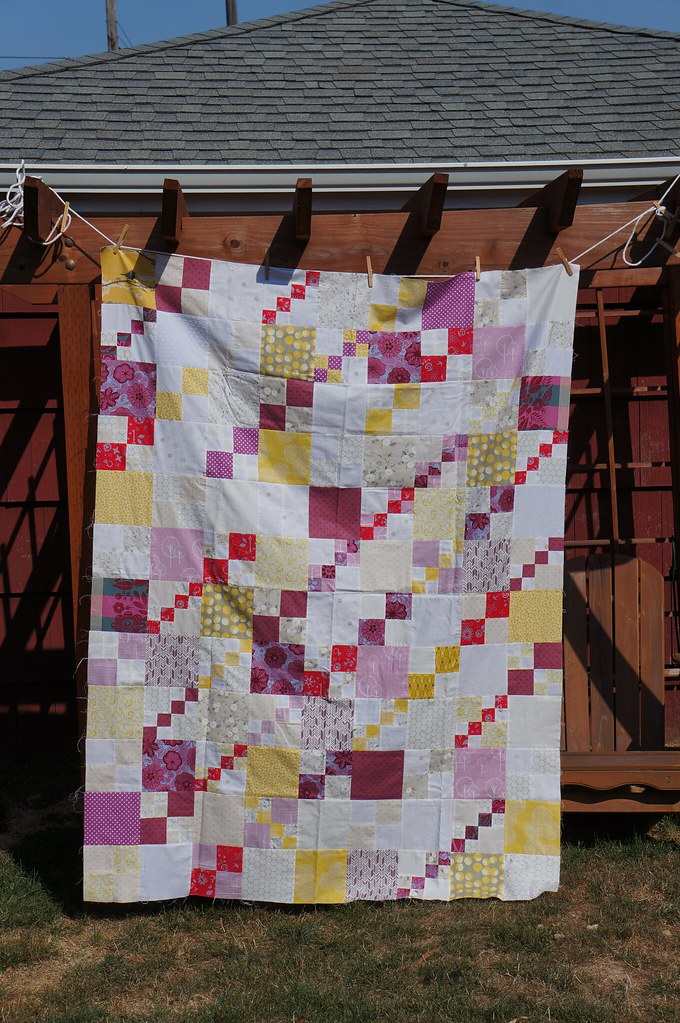
The process didn't go as fast as I thought it would but all in all wasn't too bad.  Before long I had a completed quilt top.


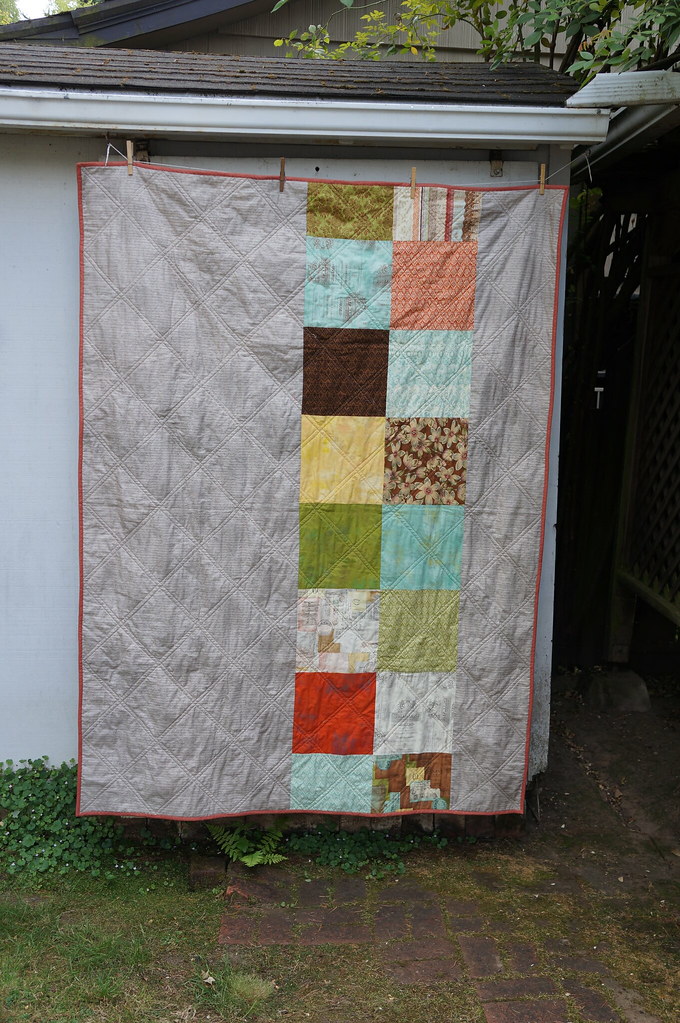
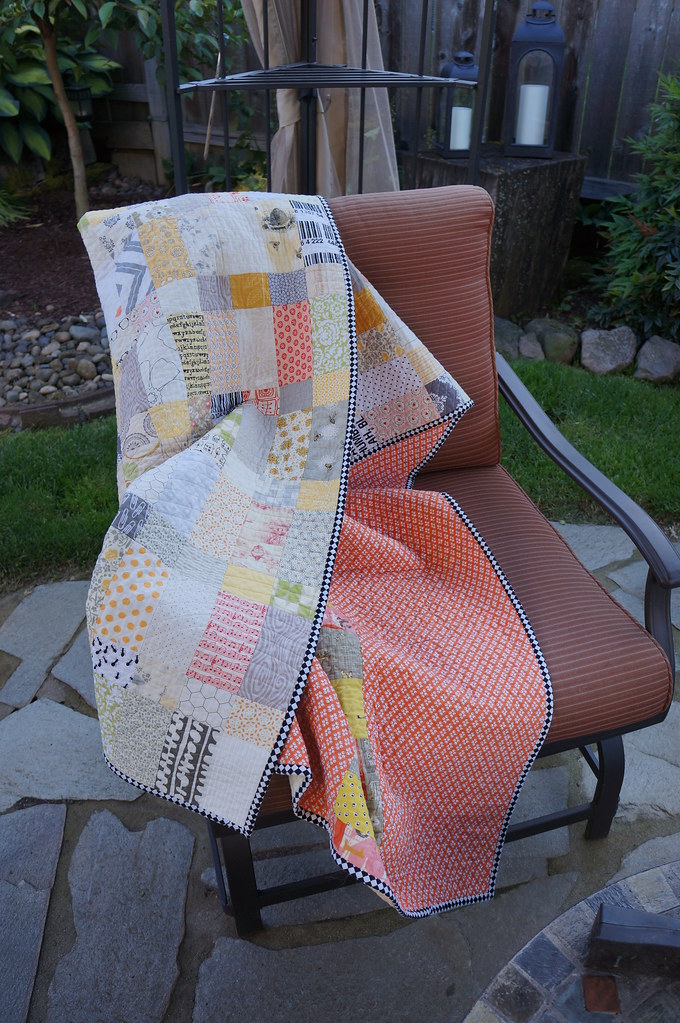
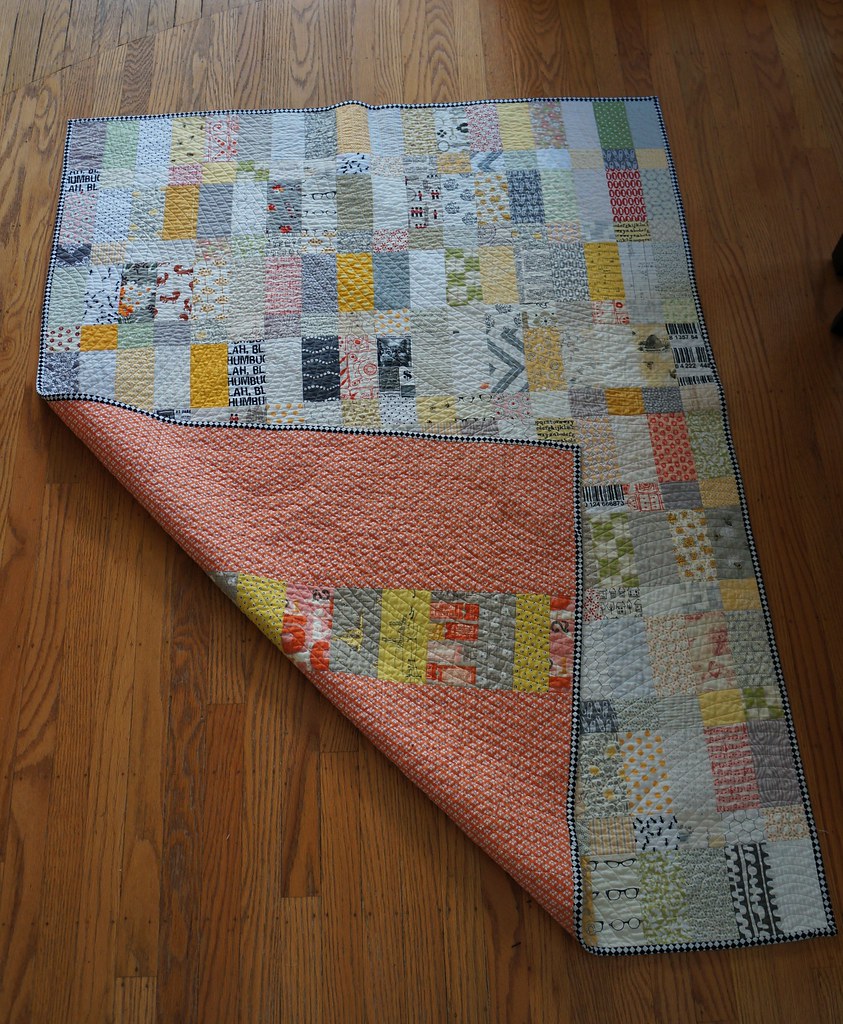
The backing went together easily and I am quite pleased with the print I ended up with the main part. It has a tiny script on it but reads mostly solid without being boring. I also used up the rest of the layer cake squares to add some interest. And let's face it, what do you do with random left over pre-cuts? I mean, throw them in the scrap box for sure, but I always struggle with how to use them. Though, I am getting better at this thanks to all the scrappy inspiration out there in blogland.

Crappy photo trying to get a feel for how the back would look.


Let the Madness Begin

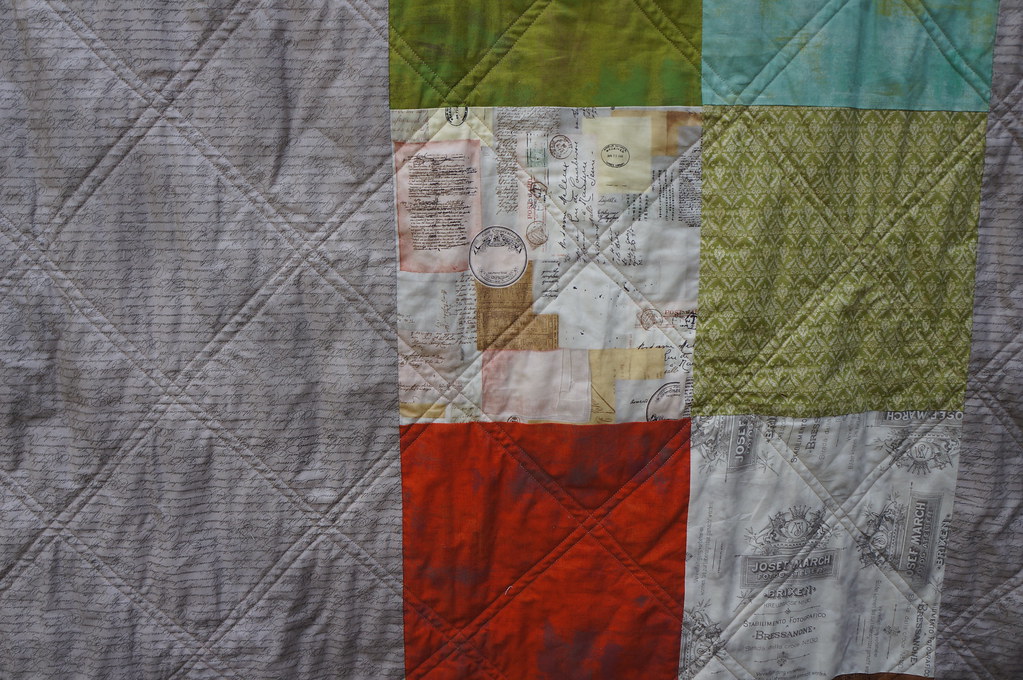
I knew that I wanted to keep the quilting simple and planned to just outline each of the hourglass shapes on either side. I picked out a medium colored brown Aurafil thread and set to work. This is where things got crazy and this quilt started it's journey to the long wait in the UFO pile.


As I was quilting, I felt like my stitches were bunching up strangely, but there weren't any wrinkles or puckers in the fabric, so I forged on. The quilting was going quite quickly so it was when I was OVER half done that I got the bright idea to give the stitches a little tug. I instantly heard, SNAP! POP! and thought, NoNoNoNoNo!  Yep, the thread broke, in many places. I kept tugging. It kept popping. It was painful, but I knew the quilt wasn't viable as it was. I still have no idea what caused it. The thread, the machine tension, the batting (which was a new kind for me)?

To the UFO pile it goes. I needed to pull out nearly ALL the stitches and start over. I had no idea when I would get around that unpleasant task.

One day when I was thinking I wanted to do nothing but watch TV and feeling guilty about it, I decided the pull the quilt out and rip stitches while keeping an eye on what Castle and Beckett where up to. It wasn't quite as painful as I had imagined, though it did take a good long while.


Back at It

After another good long wait in the UFO pile, I was ready to give the quilting another shot. I hadn't done any re-pinning or anything after the pulling the stitches out. I loaded the same thread into the same machine and set about my business. It all went beautifully. Before I knew it, I was done and the quilt was ready for binding!

Without procrastination, I went and cut out my binding, sewed it together, pressed it and got it sewn onto the quilt. I am on a roll!

To continue my progress, I made the gutsy decision to take the quilt with me to the agility trial that weekend. There is a fair amount of down time, but it isn't the cleanest place to take a not-yet-finished quilt. I managed to get half the binding hand sewn over the weekend without incident.

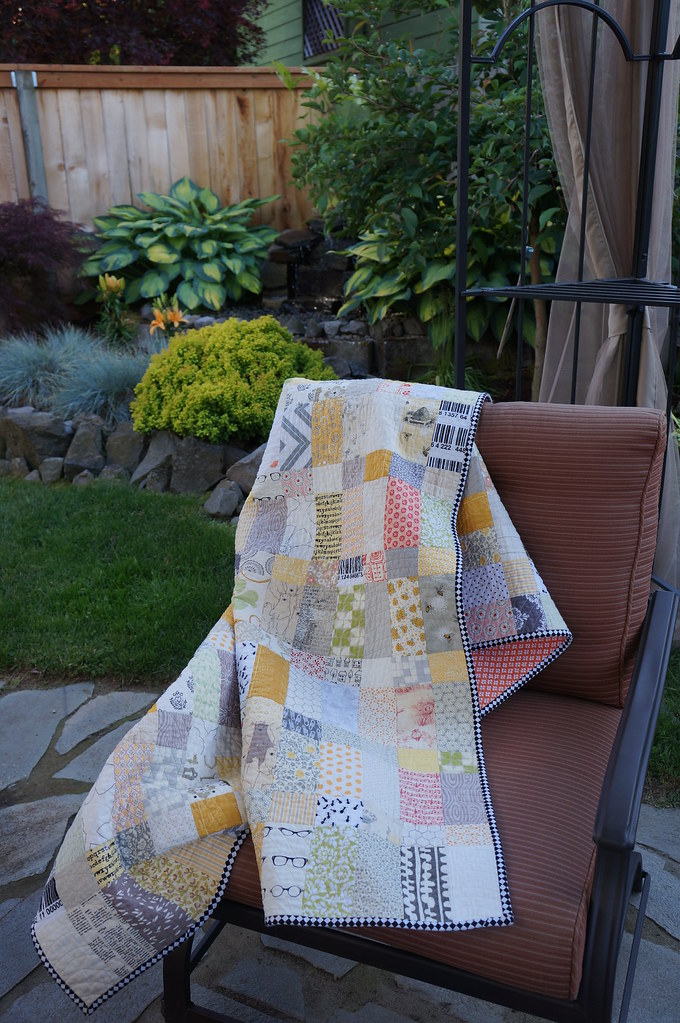
I was on a roll! It didn't take very to finish the sewing the binding and just like that, I had a finished quilt that I was darn pleased with! So far, I managed to keep it from mother's clutches and have it listed in my Etsy shop. SOLD!


DSC08904


DSC08922
DSC08913

DSC08917

Thursday, August 28, 2014

Low Volume Loveliness Complete!

Let's start back where we left off shall we?  I talked about my low volume quilt here and here.  The verdict...

I love it!


I love this quilt.  It came out perfect.  I may have almost cried a few times during the process when I was pretty sure that I ruined it, but in the end, I am over the moon happy with it!


Quilting


This was decidedly harder.  I really like straight line quilting and the texture it adds to a quilt but I didn't want straight straight lines, you know what I mean?  I don't remember if I saw something that inspired me (probably) but I ended up playing with the idea of curved straight lines and a ripple effect.  I just kept drawing different things until I hit on a combination that I liked.  Check.


Now how to execute that?

I numbered the ripples in the order that I drew them and then started with the first one.  I used to plate to get a nice curve and then quilted that line first, then the ones inside of that.  Next, I quilted bigger and bigger circles until I was where I wanted that ripple to end.  Now comes the part where I ran into trouble.  My second biggest ripple was at the other end of the quilt and even though I spray basted, I didn't feel like I got a great "lock" on all the layers. So when I started quilting the second ripple, I just knew that I was going to end up with a bunching and puckering in the middle. NOOOO!!!  Not on this quilt! This quilt that I already loved, that I hard worked so hard on, that I had used precious scrap fabrics for!!!!  At this point, I am trying not to cry.  The husband looks confused, but knows enough to just tells me it will all be okay.

Okay, regroup.  Deep breath.  How was I going to fix this?

I marked where I wanted my curves to end for big ripple at the other end.  Then I went back to the side of the quilt I started with and began to fill things in based on my pattern.  I did  A LOT of smoothing and tugging, but in the end, there was only one teensy little pucker.  A huge sigh of relief.


Binding


So for once, I knew exactly what I wanted to bind my quilt with, black and white stripes.  I have seen both Rachel and Rita do this with low volume quilts and love the look.  Trouble was, I couldn't find any!  I even made a comment on one of Rachel's blog posts, to which she kindly responded, unfortunately to say, she had no idea where she had gotten it!  Hmmm.

I headed out to trusty and giant Fabric Depot to find something.  I came home with a mostly black print with white script text.  I was feeling good.  It got the binding cut and sewed on.  I was feeling less good.  It was SO black.  But since this is how my creative process tends to go:


I forged on with the hand stitching.  I think I was about halfway through when I just couldn't take it anymore.  I didn't like it, AT. ALL.  Let the ripping commence.  And the hunt for something new.  I was down in Eugene visiting my dad so I went to a local store there.  It's a tiny little place but has a decent selection of quilting cottons.  I found this checkered pattern and decided that it had the element I was really looking for: equal parts of black and white.

Round 2 of binding went smoothly and Voila!


Love!

It makes me happy every time I see it at my desk and even happier when I pull it onto my lap, over my shoulders or drag it into a meeting room! Oh like right now :)