Wednesday, August 21, 2013

Jitterbug Isn't Going to Make It

Resigned


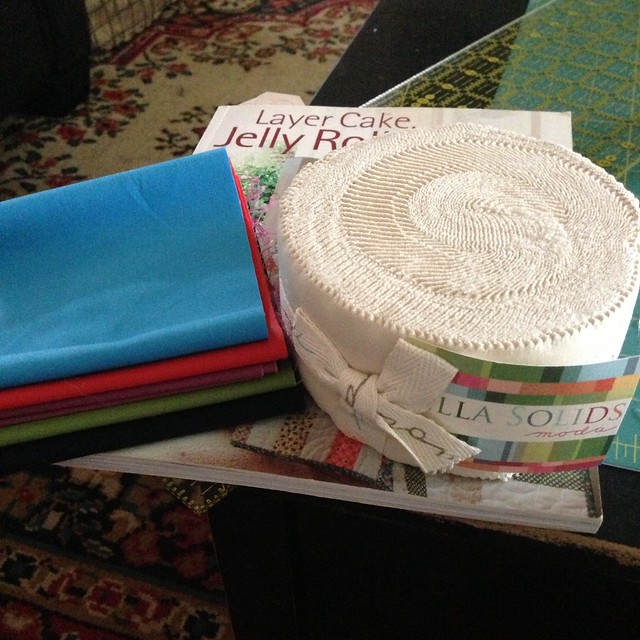
Sadly, I have experienced my first complete, utter and total quilt failure.  Truthfully, it wasn't really my fault. Although I should have seen it coming.  Remember how I said that the Shelburne Falls strips were smaller than the Moda strips in my first Jitterbug post?  Here is what I meant:


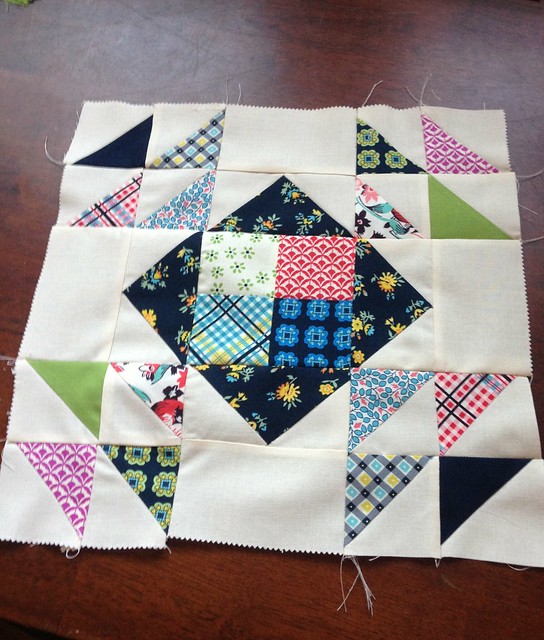
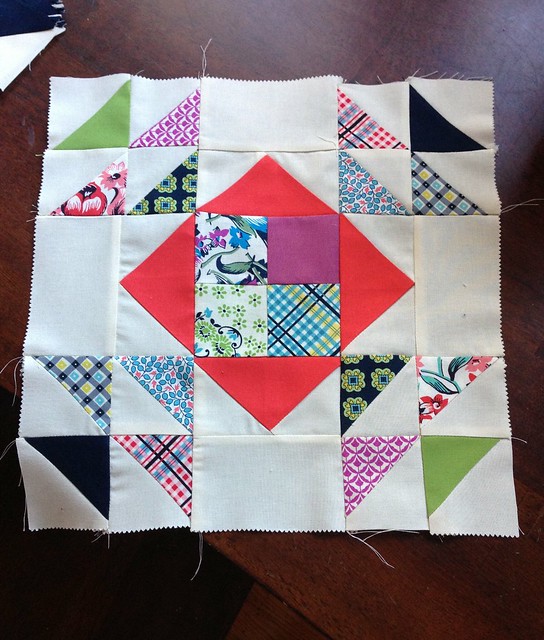
Well, that meant NOTHING lined up.  My squares weren't actually square, my flying geese were too big for the too small squares, etc. etc.  Trying to sew the blocks together was torturous.  I guess I got lucky on the first few, because after that, this is what I ended up with:

Those flying geese are ALL OVER the place.

Most of these are okay, but the bottom, yikes!

Same story here.  And look at those HST in top left hand corner, oh no no no.


I made six blocks in all and decided to throw in the towel.  I wasn't having any fun and to try and get things to play nice, I was sewing some of the slimmest seams known to man, which in turn meant that they were popping open.


The Upside


By giving up early, I still have a lot of uncut strips that I can use for other things that require small pieces.  I am a big fan of zakka style so that means I have several books full of lots of fun options. For example, a variation on this sewing machine cover:


Or these cute coasters:


Maybe a little cosmetics bag:


As for the blocks I already made?  Pillows maybe? Or I could trim the other pieces I already have made up and create some kind of sampler quilt.  At any rate, they are destined to hang out in the UFO (unfinished object) pile for the foreseeable future.

The Most Important Question


 Now what quilt should I make to take to work? And what fabric should I make it with?!?


Friday, August 16, 2013

The Lisa Lam Diaper Bag

Sometimes the Fabric Comes First


Okay, for me, the fabric comes first a lot.  I am a lot like those designers on Project Runway that go to Mood without knowing what they are going to make.  I see fabric and sometimes it tells me what it wants to be.  Other times, it is like a little whisper in my ear, "You want me, you know you do, you should take me home."  Even more often than that, it's like a three year old throwing a temper tantrum, "But you have to take me home with you!!!!  You like me so much!!!! How could you even think of leaving here without me!!!!"  And so I buy some.  I think this goes a long way in explaining my extensive fabric collection.

A while ago, I was at Bolt, a local fabric store that has very cute quilting fabrics and crazy gorgeous clothing fabrics.  And I happened upon this beauty:


It screamed awesome bag.  I knew I had to have some, but without a super specific project in mind, the question is, how much to get?  I knew that there were several cute bag patterns in the One Yard Wonders book but figured I would want something bigger than that, so I settled on a yard and a half.

After walking by the fabric several times at home, I realized that what made the most sense given it's cutesy, fun, bright nature, was to make a diaper bag.  Plus, I knew a friend who was in the market for one :)  I went to my favorite bag book, A Bag for All Reasons and there it was, the darn cutest diaper bag ever!  The best part, I totally had enough fabric!


The Making


I went to Fabric Depot to get all the interfacing and lining and got cutting.  It was so much cutting.  I took me over four hours to get all the pieces cut, so many pockets!  Then began the epic search for hardware.  Wow, this was SO HARD.  I went to ever store I could think of, including the leather supply store, including JoAnn's (and I don't go there for much).  I finally found some good stuff back at Bolt, thank goodness.  The sewing went pretty smoothly and I was very happy with my choice to go with a little lighter weight interfacing on the exterior and compensate with a little heavier interfacing on the interior.  Again, this was a lesson learned from making Amy Butler Weekender bags (you can find photos of those on Flickr, I promise, one day, I will take better photos!!!).

I also took the bag to work  to confirm that I had added enough pockets in the right places (the directions were a little confusing).  There are a lot of moms at work and since I am not one, I had no idea what you put in a diaper bag.  They were uber helpful, thanks ladies!

Getting ready to sew the interior and the exterior together!
Also, a good view of all the interior pockets.


The Bag


It turned out terribly cute!!!!!  I actually went back to Bolt and bought several more yards of the outside fabric so I could make a couple more :)

The pattern is just fantastic with this fabric.  Squeal!


One of my favorite things is that the bag is big, but not TOO big.


Tuesday, August 6, 2013

Jitterbug in Shelburne Falls: A Work in Progress

Shelburne Falls Jelly Roll

A while back I ordered a Jelly Roll  of Denyse Schmidt's Shelburne Falls fabric. It was quietly hiding in my stash until I decided that I wanted to make myself a quilt to take to work.  Originally, I thought it would be cute to make a quilt in the company colors since it was going to hang on the back of my chair and although the colors are fun (navy, aqua and orange), when I was wondering around Fabric Depot, they didn't excite me. So I figured I should turn to my rather extensive stash and make something that was on my very long "Quilts I Want to Make" list. 

Jitterbug

As I mentioned in my post "All Quilts Have a Story", I love the cover quilt from this book:


And I thought that given the vintage feel Denyse Schmidt's fabrics tend to evoke, my Shelburne Falls jelly roll would be a perfect fit!  The only trouble was the jelly roll only had 30 strips in it and the pattern called for 40.  After some hymning and hawing, I decided to pick up five coordinating solids and cut two strips out of each color.  I also decided that I was going to be lazy and purchased a jelly roll of cream colored strips so that I didn't have to cut my own :)


I was pleased with how bright most of the solids were.  There are a lot of darker prints in the line so I like getting that extra pop of color.  Also, I was hoping they would help accentuate some of the colors that are used sparingly throughout.

Getting Organized

It took me awhile to sort the strips into the different groups: squares, flying geese, half square triangles (HST), sashing and border.  I wanted to make sure to get a good variety of light and dark in the different groups.  I used little pieces of paper to identify what piles of strips where going to turn into what.

Cut, cut, cut, sew, sew, sew

There are A LOT of pieces in this quilt.  I was encouraged by my relative success with my Hopscotch blocks so I wasn't too scared to take this on.  The only real trouble I had was with the HST.  The Shelburne Falls strips seemed be 2" to 2.25" instead of a full 2.5".  They were always smaller than the Moda strips.  But I plugged along, cut out and sewed all my HST,  and the squares.  I only managed to get four flying geese sewn and was unable to resist the urge to put a full block together.

Here it is!


Isn't it fun?  This is the kind of gratification that can keep me sewing through the night, but I needed to go to a dog party with the Husband, Elma and her husband, Steve.  The dogs had a blast and Maddie even got to rip open a pinata full of dog cookies!


Once we got  home though, I was back to it!  I finished all my flying geese and chose square blocks to pair them up with.  The only thing left was to sew the HST together and WHAT. A. PAIN.  I keep sewing them the wrong direction, not in the pattern I want, ironing my seams the wrong direction, anything but what I want them to do.  Finally, I got four groups of four together (though not in the layout I intended) and was able to sew together my second block.

It looks so different from the first one!  I can't wait to finish getting the top together and share it with you!


Monday, July 29, 2013

Playing with Leather

Leather

I love leather. I have lots of leather things.  Frye Boots are probably my most favorite leather thing.  In addition to that, I love leather purses and leather details on purses.  So of course it is something that I am interested in being able to do for myself.  I got very excited a while back about getting into leather working. Then, I realized that it was a wholly different world with a steep learning curve and I had no idea where to start.  I decided that it would be best to hold off on leather and focus instead on furthering my sewing and quilting skills.  Enter My Friend Elma. 

The Teacher Arrives

After a very long break, The Husband and I reconnected with some friends of ours.  During our lengthy catch-up discussion Elma shared that she had started leather working.  My ears perked up, picture this:


Graciously, Elma agreed to show me the ropes of working with leather.  This made me excited for two reasons: One, yay!, leather and Two, more time with Elma, double yay!

My First Project and Then Some

We ran off to the leather store and got lots of supplies and fun stuff to play with.  After Elma went home I was left to play with all my new toys, which involved the family joining in and hammering away at some leather scraps.


This is what that looked like:

Elma came over the following week and walked me through the process of stamping, dying, finishing and riveting the leather.  While we were doing all this, I had the awesome idea of creating custom zipper pulls for my make-up bags.  I immediately created a little sample with some scraps:

I think it's terribly cute and I can't wait to make some with a little bird stamp and my shop initials!


The other thing I worked on was a a key chain.  I finished that a few days ago, and here it is:
During all of this, I was plotting my next move.  Something that I have always wanted to be able to do with my bags is add leather handles.  I just needed a bag to add a handle to, so I made this cute little bag from the One Yard Wonders book.  The outside with Essex Linen in Black and the lining is from Anna Maria Horner's Field Study line.


Now it just needs a handle!  Here is my little mock-up of my handle design:
Then I added some dye options:
After this was the agonizing decision making part.  This part can take a really long time and is usually only aided by my intense desire to finish the project.  In this case, only at the very last minute, and against all my natural color loving tendencies, I chose black.  Here it is all finished and put together!


Thursday, July 11, 2013

All Quilts Have a Story

The News


Maggie is pregnant.  Hooray, the brother's best friend's wife is pregnant!  Someone to make something for, and the best part, they are having a girl.  To this point, all of my friends have had boys, which is great, but I was so ready to make something super cute and girly.  And there's the rub.


The Planning


First, I ask the brother if they have nursery colors picked out.  I receive a blank stare in reply.  So I decide to ask the sister of the brother's best friend.  She tells me, no nursery colors yet, but if you are planning something, just know that Maggie hates pink.  Hmm, okay, that limits things a bit.  Next stop is the mother-in-law of the expectant Maggie.  This time I finally get some color direction.  Fall colors.  MIL is knitting a sweater and Maggie picked out some lovely fall colors.  Well now I'm stumped, how do I turn fall colors into a cute, happy, baby girl quilt?


The Digging Commences


I start going through all my boxes of fabric looking for some inspiration and direction.  There has to be something in there, right?  I have been collecting fabric to last me through the next millennia (much to the husband's dismay) so I have to have purchased something that will work.  And then there it is.  This funky Alexander Henry mushroom print that I purchased as a remnant at JoAnn's for no apparent reason.  It's perfect, don't you think? The colors are fall but fun, now this I can work with.

Planning Phase 2


Okay, I have an inspiration fabric.  Now what am I going to make with it?  I didn't want to do anything too complicated because I wanted to finish it in time for the shower, which of course isn't even being planned yet,but for once, I am trying to be realistic.


I went to a book that I have started to consider a staple: Layer Cake, Jelly Roll, and Charm Quilts.  I will admit that I am not super crazy about most of the fabric choices throughout the book, but the patterns are fun and I love the cover quilt (which I have fabric picked out and purchased for, Denyse Schmidt's Shelburne Falls line, but I digress).  


I'm flipping through the pages she this quilt.  The intro reads, a fun, fast quilt for when you need a last minute gift (I don't really think of quilts as something you do last minute, but I did make one in three days once, but that's another story for another day).  Alright, this will work, off the Fabric Depot to pick out some fabric to make my own layer cake with, fun!

Picking the Fabrics


I spent a good long while at Fabric Depot picking out fabrics.  My quilt math told me that I should pick out three pairs of fabric for the dark colored diamonds and three pairs of fabric for the light colored diamonds.  That would give me three diamonds of each pair.  I quickly decided on orange and yellow, but when I got that in basket, something was missing, so I picked out a pair of dark brown fabrics also.  For the lighter prints I went with things that had white or cream backgrounds, or were lighter versions of the dark fabrics.  I thought this would make everything relate without being too matchy matchy.

BUT, when I got everything home and started looking at it, I did not get the happy, this is going to be great feeling.  It was TOO much and the citron was yuck and over the top.  So, digging phase 2 commenced.  I found three fabrics in my stash that really helped mellow things out.  With my new light brown pair and less intense pair for my white and yellow polka dots and no citron, I was ready to go!

The Making


The cutting and sewing of quilt top went pretty smoothly.  Minus the part where I didn't realize that you had to alter the direction of your cuts to create the diamonds since they aren't symmetrical, whoops.  At least I realized that before I had cut out all of my fabric, that would have been BAD.

I got all the diamonds together and wasn't really that happy with the quilt, it just didn't speak to me.  Boy was I surprised with what a huge difference adding the scrappy border made.  It was a whole new quilt!  I started to think this is going to turn out pretty good.

As I mentioned before, I generally don't buy backing for a quilt until I finish the top, so I took my top to Fabric Depot (I also like the positive feedback I get from other shoppers and the nice ladies that work there when I bring projects in, it feels good to get compliments doesn't it?).  It didn't take too much looking before I found the perfect backing.  I had already decided that I was going to purchase just one width of fabric in the correct length and then stretch it by inserting two rows of left over dark strips.  Clever right?  This is something that you can easily do with any quilt that is just a hair over 44" wide and it adds great visual interest to the back.


The Meltdown


So I had gotten behind in my timeline and the shower was rapidly approaching, as in, it was the next day and I still needed to quilt and bind.  Things are not looking good but all hope is not yet lost.  And then my machine decided not to cooperate.  It completely seized up with the quilt stuck under the needle, AHHHHH! Here is the husband working his heroic magic, but at that point, my nerves were fried.  I did get the quilting done, but  I did not make it to the shower.


Baby Olivia


She's here, welcome to world little one!  Wouldn't it be nice if you had a fun quilt to snuggle in?  Yes, it would you say?  I guess I should finish that then.  I do struggle when I miss a deadline like that, the sense of urgency is suddenly lost and I move on to other things.  It is something that I am working on.  Do any of you struggle with that too?

So swift kick in the pants received and noted.  I got things finished up quickly since there wasn't much left to do, just needed to get the binding on.  Here it is:


I kept the quilting simple and just outlined the diamonds.  Seeing the design come through on the back was really neat.


I am so so happy with how it turned out!  I never imagined that dark mushroom print could turn into this!  I think it is cute, happy and fun while still being something that Maggie will like, and hopefully use all the time.

Wednesday, June 26, 2013

The Almost Hat

Originally

I wrote this post around March of this year. One of the biggest hurdles I have had in regards to blogging is getting pictures taken, uploaded, edited and then in the right place at the right time.  Truthfully, it is also a challenge when it comes to getting items into my Etsy shop.  I mean, you take ALL that time to make something and you feel so good that you got it done, Hooray! but yhen, there is still. so. much. work. to do.  Anyone else out there know what I mean?

So I have been working on some solutions (by which I mean whining to the husband that my life is too hard) and think that things are coming along nicely.  We still don't quite have a handle on this whole cloud thing, but once we do, I think it is going to be great!

Anywho, this (almost) project is still a fun little story that I wanted to share, even if it is a few months out of season :)

The Presenting Complaint

Here's the thing, I have a small head.  This means that hats are a challenge for me and given that I live the glorious Pacific Northwest, they are often necessary.  I have been finding particular need for them lately during agility practice and trials.  Given my small headedness, I have two choices: have a hat that covers my ears (my preference) but is too big and sinks down over my eyes, or a hat that doesn't impede my vision, but also does not cover the ears.  Booger.  Generally, I have been opting for the latter since not being able to see doesn't work out so well when you are running around an obstacle course :-P


The Proposed Solution


To make my own hat of course!  I had been eyeballing a pattern for a cute pilot hat in a book I recently got, Sewn by Hand, but I needed an excuse to make one.  

This definitely counts!  I set about gathering materials.  I didn't really want to make it out of recycled sweaters, truthfully, I am not really a big fan of upcyling used goods.  Plus, I wanted to line the inside with fleece to make it a little extra cozy.  Overall, I was thinking of a bit more polished look for my hat.  I was with my mom and brother at a super cute local fabric store, Bolt, and found this great home dec weight plaid by Joel Dewberry.  Then there was a trip to Fabric Depot for fleece and trim :)  I got home with my goodies and set out to get started.
 

First, I traced the pattern pieces onto a sheet of paper.  Trying to maneuver a book around in the printer/copier and not get a contorted image is pretty challenging so I avoid that if I can.  I took my tracing and enlarged the pieces the 200% that it called for in the book.  Then I cut out.

Cute right?


Next, I traced the pattern pieces onto my fabric and cut those out.  Yippee, the plaid is going to be awesome!  The ear flaps looked like the were going to be just the right too.  The even better part was that I would have a new hat TODAY.  I love quilts, but they take time to come together.  I need to be a little better about interspersing these little projects that can be completed in a single afternoon. 


The Not So Much


I started sewing my pieces together (yes, according to the directions) and this is when I started to get a little worried.  The hat was looking small and since I already know I have a small head, that's not good.

I pretty quickly got the rest of it completed and here is what I ended up with:


Wha, wha.  Not so much on the one size fits most there.  Maybe one size fits most kids . . . even though that isn't what is pictured in the book.  Perhaps I didn't enlarge correctly?


And then I was stuck.  Do I just enlarge the whole thing and then trim down the ear flaps so they aren't gi-huge-ic?  Do I just try and draft my own pattern so that I am sure it will fit even though that sounds difficult and the proportions might be off?  Hmmm, not really sure.  Disappointed, not enough brain power, so, no hat for Whitney today.  I went back to working on my Hopscotch quilt.


As for the hat, the next step, when it happens, it to make a muslin mock-up of my next pattern, whatever that may be.  I have enough plaid to make the actual hat but I don't have enough for several more rounds of mistakes.  I will make to sure to post an update on the process once I return to it.  Depending on what the weather here does, that could be awhile.

If anyone has worked with this pattern, let me know!

Saturday, June 22, 2013

Starting Hopscotch

Needing a little reset


At the beginning of the year I made a pretty big push to get more items completed and listed in my Etsy shop.  I managed to add eight more things, which doubled my inventory, woo hoo!  The main reason for this was that I was trying to get into the o-so coveted Crafty Wonderland show in May.  Despite all my best efforts, this did not happen.  I wasn't terribly surprised, but still kinda bummed.  

At that point, I decided that I needed to take some time and make something for me.  It has been awhile since I have done this.  I was going to make myself the perfect sized make-up bag to put in my gym bag, but that ended up in my Etsy shop.  Also on my list is a case for my Kindle Paperwhite, an awesome Christmas present from my hubby.  I even have the fabrics picked out, but since I need to make some pattern tweaks, it just hasn't happened.


Have to have it!

I did not start reading quilt blogs (or any blogs for that matter) until pretty recently.  One of the first blogs that caught my attention was Jolene's.  I saw a cute granny square quilt somewhere and went looking for a tutorial.  It lead me straight to her lovely blog!  Recently she posted this beauty.  OMG, love, love, love!  Instantly, I knew what my project for me was going to be.  My very own hopscotch quilt!  Truthfully, I would have preferred to be a total copy cat because the yellows and pinks in that fabric line are to die for, but, alas, despite thorough web searching, there is very little Dream On left to be found.  The other thing I love about those fabrics is that they have that vintage sheet feel of which I am a total fan.

I was not dismayed for long though, because Miss Spain has a new fabric line out, Honey Honey.  There isn't any yellow in the line, but there are all of these bright, yet pastel-ly fabrics that are so fresh and so spring.  Plus, it also has some of the vintage sheet feel to it.  Hooray!  I did not delay in purchase of the pattern or Honey Honey jelly roll.  The only thing that gave me a little pause was what color to use for the stars.  I have been trying to push myself not to make things so matchy matchy. The safe bet was a blue that would look lovely with everything, but I knew I wanted the stars to stick out a bit more.  Being brave, I decided to make my stars out my new favorite color, mint, and purchased Kona Cotton in Pool. 


Getting Started

Something that I have found to be useful in my time as a sewist is to search the blogosphere for tips and tricks on popular projects.  It helped me out quite a bit when I made my Amy Butler Weekender Bag (god, what a chore that one was).  First, I learned from Jolene that making a template is a good thing, so I did that, even though I only ended up really using the triangle and  trapezoid.  Next, I learned the two most important things about making this quilt here: 1. Press seams open 2. Do not trim the dog ears (I can't tell you how much this helped me with lining things up).  With all of my found knowledge I set about making my blocks.

This is by far the most complicated quilt that I have ever made and I was pleased as punch when most of points lined up!  There are some not so stellar examples, but instead of fretting about it, I decided that I could just put them on the edges that would end up being cut off :)


Not so good points.

Good points here.

And good points here.

Several sessions later, voila, my blocks are done!


I am feeling pretty good about my choice of mint for the stars, I am kind of obsessed with that color.


Laying the blocks out is going to be so much, I just need to have some time.  I know it won't be this weekend, the husband and I have an out of town wedding to go to!