Thursday, November 14, 2013

Hidden Stars Quilt

Remember this UFO?


This quilt was by far the closest to being done out of all the UFO's on list (you can see the full catalog of UFO's here).  

A Bit of Backstory


I was making this quilt for one of my aunts that had not so subtly hinting that she would like a quilt from me.  My aunt Connie is an awesome lady so I was happy to get started on something for her.  Connie is an artist and likes to paint with a lot of bright, bold colors so I knew that I wanted to factor that in to my fabric choice.  I ended up going with Cuzco by Katie Spain.


I bought a Layer Cake since there were so many good fabrics in line and headed straight for my pre-cut quilt pattern book.  There were a couple of things that I really liked about the Hidden Stars pattern.  One was the finished size, 50" x 60", quick and manageable.  Second was that I felt like it would really allow the saturated colors of the Cuzco collection to shine.  I choose a medium grey for my stars and got cutting.

The top went together pretty easily and quickly.  
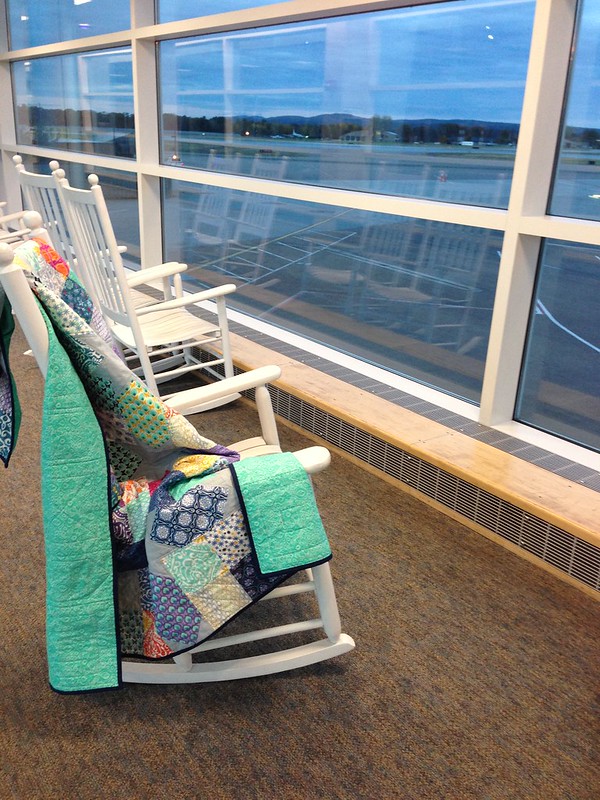
I was really pleased with how it turned out.  I chose a bright teal that has a tone on tone pattern and mostly reads like a solid (in the above photo it is the bottom print third from the left) for the backing.  I also picked a fun multi-color variegated thread for the quilting!  

My quilting plan was to just outline each element.  As an added bonus, the different thread colors really came to life against the solid grey stars.  I made a pretty good push and got about a third of the quilting done and then my motivation. just. ran. out.  


A New Kick in the Pants


An impending trip to the east coast finally spurred me to action.  I was going to Lake Placid, NY for a week for a work trip!  As soon as I found that out about the trip I knew I would be staying a few extra days to see family.  I was really happy when I found out that people were actually going to travel in from around the state to see me.  This included my Aunt Connie.  What could be better than getting to give her the quilt in person !?!

So I picked up the quilt and set back to work.  Once I finished the quilting, I thought, “Shoot, I don't have any binding fabric, and if I do, I don't know where to look for it.”  The trip to Fabric Depot was quick but then I realized that I two nights at the agility barn ahead of me, then Wednesday night I would need to pack for my Thursday morning flight.  Hmm, when was I going to bind this quilt?  

I managed to get the binding cut out and sewn together on Wednesday night and then at 5am on Thursday morning I got it stitched onto the quilt, eek!  After having carefully inspected the TSA website, I was pretty sure that I could get embroidery scissors, needle and thread on the plane :)


It was cramped quarters but sewing the binding sure made my six hour flight Dulles go by quickly!


P.S. My aunt was TOTALLY surprised and absolutely loved it!

Tuesday, November 12, 2013

Big, Bright Granny Sqaures

Ahh!

There has been so much going on that I haven't been able to keep up.  The good news is that I have been sewing and getting things done!  I have lots that I want to share and I will start with this post, which sadly I began more weeks ago than I like to admit, so without further ado, here is a start to all things I have to tell you!

Non-existent Tote Bags

As I mentioned before, Jolene's blog was the first that I stumbled upon when I found her Granny Square tutorial.  I loved the design and periodically checked back to see what she was up to.  I am often inspired by her work and I have linked to a couple of different photos of hers in my Hopscotch and Onto the Next posts.  I didn't officially start following her blog, or any blogs for that matter, until after I started this one and discovered Bloglovin' (which I really do love, BTW).

I had purchased some small cuts of really brightly colored fabrics thinking I was going to put them into tote bags like these with different patchwork designs.


But, as so many things go with me, I was bored of making tote bags pretty quickly and they never came to fruition.  So I had these great fabrics and this awesome pattern, why not put them together?

I don't have any fancy quilt design software so I either draw on graph type paper and color with pencils or, if the design will allow, as this one did, use Excel.  Nerdy, I know.

Here is what my “sketch” looked like:


I couldn't put the blocks on point like I planned, but all
the color combos are there, which is what I was going for.


Working Away from Home


Before the Nicholls State game my dad asked if we would stay in Eugene on Sunday to help him put in a window.  By this he meant, would the husband help him put in a window, leaving me to entertain myself save the intermittent calls to "come hold this." So I made darn sure that I wouldn't be bored.

My dad was quite confused as I re-arranged a portion of his living room, but I came up with a pretty good set-up.  My ironing board was a TV tray with a towel on top so I was glad that I was working on small blocks. 


Yes, there is a dog hiding under the table.


Whilst my father commenced cutting a hole in his house, in his pajamas, I might add, I started sewing.  


I got a good system going and before I knew it, viola! All my blocks were done and looking quite bright and fun, just like I wanted!


Finishing Up


I added the sashing and finished the top in the next few days.  It turned out so stinking cute! 


I was surprised how close I got to my original design.


A close up of one of favorite blocks.


I have some fabulous Cuddle fabric for the back so I nervously tossed in the washer/dryer to pre-shrink.  Hooray!  It came out perfect so I gave it a good ironing.

Love the color of the Cuddle fabric for the back!


 This is going to be my foray into spray basting since I haven’t had any luck pin basting Cuddle.  It’s a love/hate thing me and Cuddle have going on.  In addition to that I have to decide on a quilt design . . . wish me luck!