Monday, July 29, 2013

Playing with Leather

Leather

I love leather. I have lots of leather things.  Frye Boots are probably my most favorite leather thing.  In addition to that, I love leather purses and leather details on purses.  So of course it is something that I am interested in being able to do for myself.  I got very excited a while back about getting into leather working. Then, I realized that it was a wholly different world with a steep learning curve and I had no idea where to start.  I decided that it would be best to hold off on leather and focus instead on furthering my sewing and quilting skills.  Enter My Friend Elma. 

The Teacher Arrives

After a very long break, The Husband and I reconnected with some friends of ours.  During our lengthy catch-up discussion Elma shared that she had started leather working.  My ears perked up, picture this:


Graciously, Elma agreed to show me the ropes of working with leather.  This made me excited for two reasons: One, yay!, leather and Two, more time with Elma, double yay!

My First Project and Then Some

We ran off to the leather store and got lots of supplies and fun stuff to play with.  After Elma went home I was left to play with all my new toys, which involved the family joining in and hammering away at some leather scraps.


This is what that looked like:

Elma came over the following week and walked me through the process of stamping, dying, finishing and riveting the leather.  While we were doing all this, I had the awesome idea of creating custom zipper pulls for my make-up bags.  I immediately created a little sample with some scraps:

I think it's terribly cute and I can't wait to make some with a little bird stamp and my shop initials!


The other thing I worked on was a a key chain.  I finished that a few days ago, and here it is:
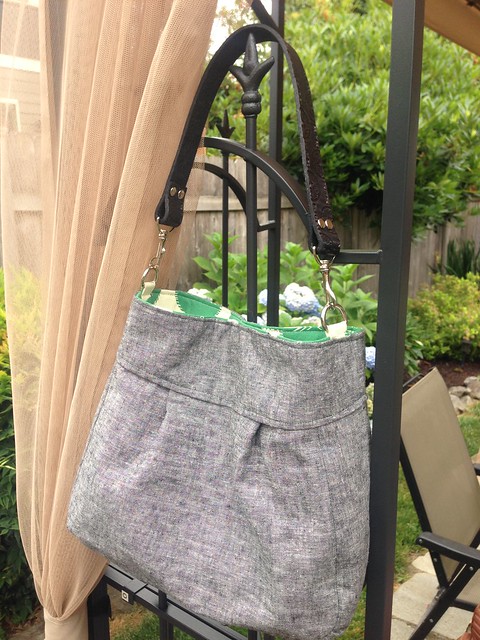
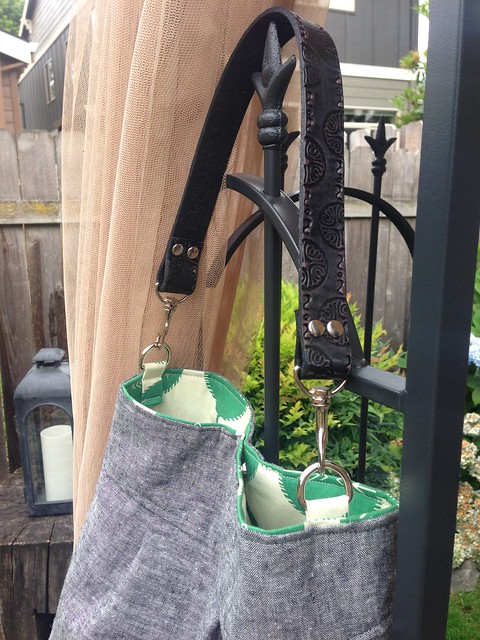
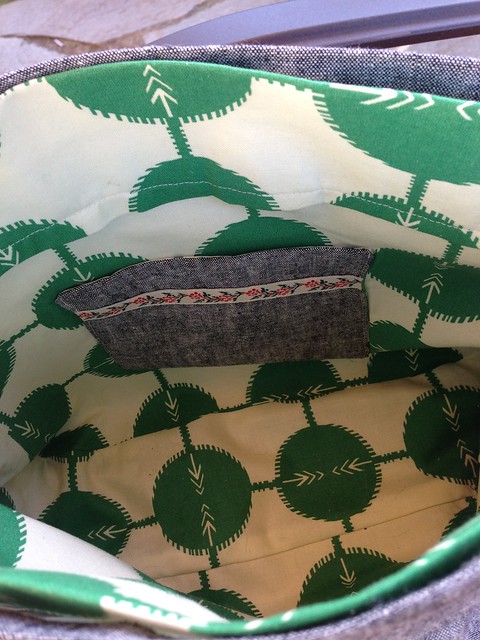
During all of this, I was plotting my next move.  Something that I have always wanted to be able to do with my bags is add leather handles.  I just needed a bag to add a handle to, so I made this cute little bag from the One Yard Wonders book.  The outside with Essex Linen in Black and the lining is from Anna Maria Horner's Field Study line.


Now it just needs a handle!  Here is my little mock-up of my handle design:
Then I added some dye options:
After this was the agonizing decision making part.  This part can take a really long time and is usually only aided by my intense desire to finish the project.  In this case, only at the very last minute, and against all my natural color loving tendencies, I chose black.  Here it is all finished and put together!


Thursday, July 11, 2013

All Quilts Have a Story

The News


Maggie is pregnant.  Hooray, the brother's best friend's wife is pregnant!  Someone to make something for, and the best part, they are having a girl.  To this point, all of my friends have had boys, which is great, but I was so ready to make something super cute and girly.  And there's the rub.


The Planning


First, I ask the brother if they have nursery colors picked out.  I receive a blank stare in reply.  So I decide to ask the sister of the brother's best friend.  She tells me, no nursery colors yet, but if you are planning something, just know that Maggie hates pink.  Hmm, okay, that limits things a bit.  Next stop is the mother-in-law of the expectant Maggie.  This time I finally get some color direction.  Fall colors.  MIL is knitting a sweater and Maggie picked out some lovely fall colors.  Well now I'm stumped, how do I turn fall colors into a cute, happy, baby girl quilt?


The Digging Commences


I start going through all my boxes of fabric looking for some inspiration and direction.  There has to be something in there, right?  I have been collecting fabric to last me through the next millennia (much to the husband's dismay) so I have to have purchased something that will work.  And then there it is.  This funky Alexander Henry mushroom print that I purchased as a remnant at JoAnn's for no apparent reason.  It's perfect, don't you think? The colors are fall but fun, now this I can work with.

Planning Phase 2


Okay, I have an inspiration fabric.  Now what am I going to make with it?  I didn't want to do anything too complicated because I wanted to finish it in time for the shower, which of course isn't even being planned yet,but for once, I am trying to be realistic.


I went to a book that I have started to consider a staple: Layer Cake, Jelly Roll, and Charm Quilts.  I will admit that I am not super crazy about most of the fabric choices throughout the book, but the patterns are fun and I love the cover quilt (which I have fabric picked out and purchased for, Denyse Schmidt's Shelburne Falls line, but I digress).  


I'm flipping through the pages she this quilt.  The intro reads, a fun, fast quilt for when you need a last minute gift (I don't really think of quilts as something you do last minute, but I did make one in three days once, but that's another story for another day).  Alright, this will work, off the Fabric Depot to pick out some fabric to make my own layer cake with, fun!

Picking the Fabrics


I spent a good long while at Fabric Depot picking out fabrics.  My quilt math told me that I should pick out three pairs of fabric for the dark colored diamonds and three pairs of fabric for the light colored diamonds.  That would give me three diamonds of each pair.  I quickly decided on orange and yellow, but when I got that in basket, something was missing, so I picked out a pair of dark brown fabrics also.  For the lighter prints I went with things that had white or cream backgrounds, or were lighter versions of the dark fabrics.  I thought this would make everything relate without being too matchy matchy.

BUT, when I got everything home and started looking at it, I did not get the happy, this is going to be great feeling.  It was TOO much and the citron was yuck and over the top.  So, digging phase 2 commenced.  I found three fabrics in my stash that really helped mellow things out.  With my new light brown pair and less intense pair for my white and yellow polka dots and no citron, I was ready to go!

The Making


The cutting and sewing of quilt top went pretty smoothly.  Minus the part where I didn't realize that you had to alter the direction of your cuts to create the diamonds since they aren't symmetrical, whoops.  At least I realized that before I had cut out all of my fabric, that would have been BAD.

I got all the diamonds together and wasn't really that happy with the quilt, it just didn't speak to me.  Boy was I surprised with what a huge difference adding the scrappy border made.  It was a whole new quilt!  I started to think this is going to turn out pretty good.

As I mentioned before, I generally don't buy backing for a quilt until I finish the top, so I took my top to Fabric Depot (I also like the positive feedback I get from other shoppers and the nice ladies that work there when I bring projects in, it feels good to get compliments doesn't it?).  It didn't take too much looking before I found the perfect backing.  I had already decided that I was going to purchase just one width of fabric in the correct length and then stretch it by inserting two rows of left over dark strips.  Clever right?  This is something that you can easily do with any quilt that is just a hair over 44" wide and it adds great visual interest to the back.


The Meltdown


So I had gotten behind in my timeline and the shower was rapidly approaching, as in, it was the next day and I still needed to quilt and bind.  Things are not looking good but all hope is not yet lost.  And then my machine decided not to cooperate.  It completely seized up with the quilt stuck under the needle, AHHHHH! Here is the husband working his heroic magic, but at that point, my nerves were fried.  I did get the quilting done, but  I did not make it to the shower.


Baby Olivia


She's here, welcome to world little one!  Wouldn't it be nice if you had a fun quilt to snuggle in?  Yes, it would you say?  I guess I should finish that then.  I do struggle when I miss a deadline like that, the sense of urgency is suddenly lost and I move on to other things.  It is something that I am working on.  Do any of you struggle with that too?

So swift kick in the pants received and noted.  I got things finished up quickly since there wasn't much left to do, just needed to get the binding on.  Here it is:


I kept the quilting simple and just outlined the diamonds.  Seeing the design come through on the back was really neat.


I am so so happy with how it turned out!  I never imagined that dark mushroom print could turn into this!  I think it is cute, happy and fun while still being something that Maggie will like, and hopefully use all the time.